

I’ve always loved the taste of fresh tomatoes especially when they’re sweet, juicy, and full of flavor. But where I live, there isn’t much open space for gardening. For a long time, I thought growing my own tomatoes was impossible. Then one day, I decided to try something new container gardening. I thought, “If I can’t have a big garden, maybe I can make a small one in pots.” That small decision turned into one of the best experiences of my life.

At first, I didn’t know much about growing plants in containers. I started with a few small pots, some soil, and a handful of tomato seeds. I still remember how excited I felt holding those tiny seeds in my hand it was like holding little promises of life. I wanted to see them grow, to care for them, and to someday taste the fruits of my own effort. My curiosity and love for fresh homegrown food gave me the push to start this beautiful journey.
The first time I tried, things didn’t go perfectly. Some seeds didn’t sprout, a few seedlings got too much water, and one plant even broke during transplanting. But instead of giving up, I learned something new from each mistake. I realized that gardening is not about perfection it’s about patience and care. Every little step taught me how nature works and how small changes make a big difference.
In this blog, I’ll take you through my complete journey from choosing the right tomato seeds, preparing the soil, sowing and germinating, transplanting into bigger pots, and caring for the plants, all the way to harvesting and ripening those beautiful red fruits. Each step came with its own lessons, challenges, and little victories. I’ll share not only what I did but also how I felt because growing tomatoes isn’t just about plants, it’s also about emotions.
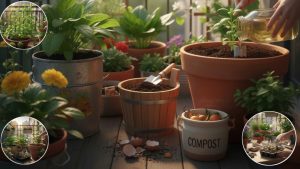
Container gardening is a great option for anyone especially beginners like me when I first started. You don’t need a big backyard or fancy tools. Just a few pots, some soil, sunlight, and a bit of love are enough. What I love most about container gardening is how flexible it is. You can move your plants to get more sun, control the soil mix, and avoid many common garden pests. It’s perfect for small balconies, rooftops, or even a sunny window corner.
After about three months of learning, watering, and caring, I finally got to pick my first homegrown tomato. It was small, red, and shiny and honestly, it tasted better than anything I ever bought from a store. That one tomato made me feel so proud and connected to nature. It showed me that with a little patience and consistency, anyone can grow something beautiful even in a tiny space.
So, if you’ve ever dreamed of growing your own food, this story is for you. Let me take you through my journey step by step so that you can experience the same joy I did, watching a tiny seed turn into something amazing. 🍅
Step 1: Selecting the Right Tomato Seeds 🍅

When I first decided to grow tomatoes, I didn’t know much about different types of tomato seeds. Later, I found out there are many kinds cherry, plum, and beefsteak tomatoes. Cherry tomatoes are small and sweet, perfect for salads. Plum tomatoes are a bit thicker and great for making sauce, while beefsteak tomatoes are big and juicy just right for sandwiches. I thought a lot before choosing mine. Since I was growing in pots, I picked cherry tomatoes because they grow easily and don’t need a lot of space. That choice made my gardening journey a lot smoother.
I still remember the day I went to buy my seeds. I went to a local plant shop near my home because I wanted to see the packets myself. I held those tiny seeds in my hand and felt excited they were so small, yet full of life. The shopkeeper told me about hybrid seeds that grow faster, but I decided to try a local variety first because our weather is quite hot. Later, I realized I made the right choice the local seeds handled the summer heat much better than hybrid ones.
Before planting, I wanted to make sure my seeds were good. I learned a simple trick from YouTube the water float test. I took a glass of water, dropped all the seeds in, and waited a few minutes. The seeds that sank were healthy, and the ones floating on top were weak. Out of 20 seeds, 14 sank, so I kept those. Later, all 14 sprouted, which made me super happy! I didn’t expect such success on my first try.
But everything wasn’t perfect. The first time I planted, I made a small mistake I buried the seeds too deep. They took longer to sprout, and I got worried. I thought maybe they were dead! Later I learned tomato seeds need to be planted just under the surface, not deep down. When I corrected that, the next batch came out quickly within a week. That little experience taught me a lot about patience and proper planting.
I also noticed that light and water play a big role during this stage. I used to keep my seed tray near a sunny window where it got soft morning light. At first, I watered a bit too much, and the soil stayed soggy some seeds didn’t like that. Then I changed my method I started using a spray bottle to keep the soil just moist, not wet. That small change made a big difference. The seedlings grew stronger and looked healthy.
Choosing and testing seeds may sound like a small step, but I learned it’s the foundation of the whole journey. Good seeds grow into strong plants, and strong plants give beautiful fruits. Now, whenever I see a tomato plant growing in my pots, I remember that it all started with those tiny seeds and my small experiments. It felt like magic something simple, but full of life and hope.
Also Read: Small-Scale Worm Composting
Step 2: Preparing the Perfect Soil Mix 🌱

When my tomato seeds finally sprouted, I knew it was time to prepare the perfect soil mix for transplanting. At first, I thought I could just use the soil from my backyard, but later I realized tomatoes are a bit choosy about their soil. They love loose, well-draining, and rich soil not something too heavy or sticky. Tomatoes don’t like wet feet, so the soil should hold some moisture but not stay soggy. I read that the perfect soil for tomatoes has a slightly acidic nature, around pH 6 to 6.8, and that’s what I tried to make.
When I started mixing the soil, I used three main things: cocopeat, compost, and sand. Cocopeat helps keep the soil soft and airy. Compost gives it nutrients, and sand improves drainage. I also added a little bit of garden soil just to give the mix some weight and natural microbes. The first time I mixed everything, I used a big plastic bowl, and honestly, I enjoyed doing it with my hands. It felt like I was cooking something for my plants!
For my own recipe, I used about 40% compost, 40% cocopeat, and 20% sand. I didn’t have to buy compost because I already made some at home from kitchen waste like fruit peels and vegetable scraps. I kept them in a small compost bin for a few months, and it turned into rich, dark compost that smelled like earth after rain. I felt proud using something I made myself. I also noticed that when I used this organic compost, my tomato plants grew faster and greener. It was like they were saying “thank you” in their own plant language!
But not everything went perfectly the first time. I made one big mistake I used too much garden soil in the beginning. The mix became heavy, and water didn’t drain properly. After watering, I saw water sitting on top for a long time, and that made the roots weak. Some of my early seedlings even turned yellow. That was a sad moment for me, but it taught me a big lesson — tomatoes hate waterlogging.
After that, I tried again. This time I added more cocopeat and sand to make the soil lighter. I mixed it well, and when I watered it, I saw water draining quickly from the bottom holes of the pot. That’s when I knew it was perfect. Soon after transplanting, my tomato plants started growing strong again. The leaves looked fresh and healthy, and I could see new growth every few days. That made me really happy because I knew I had fixed the problem myself.
Now, every time I prepare soil, I take my time. I touch it, feel the texture, and make sure it’s soft, airy, and full of life. I realized that good soil is like a mother if you give it care, it will take care of your plants in return. So, if you ever plan to grow tomatoes in pots, don’t rush this step. The right soil mix is the secret behind happy tomato plants and a beautiful harvest later on.
Step 3: Seed Sowing and Germination Process 🌱

After preparing my perfect soil mix, the next exciting step was sowing the tomato seeds. I decided to use small cups and egg cartons because they were easy to handle and saved space. I filled each cup with my soil mix, made tiny holes about half an inch deep, and dropped one seed in each hole. I carefully covered them lightly with soil and pressed gently. I also made sure to leave some space between seeds so their roots would have room to grow. I remember feeling so excited placing each tiny seed in its little home it felt like I was planting little treasures.
Next, I set up my germination area indoors near a sunny window. I wanted the seedlings to get enough light, but I soon learned that direct sunlight in the afternoon was too strong for them. So, I adjusted the cups to get soft morning light instead. I also kept the room warm, around 70–75°F, which I learned is perfect for tomato germination. On some cloudy days, I used a small grow light for a few hours. I was amazed at how careful attention to light and temperature could make such a big difference.
I kept the soil moist but not soggy, using a small spray bottle to water gently every day. Overwatering was a problem at first I was too excited and wanted to see them grow fast. Some soil stayed too wet, and I noticed a few seeds were struggling. Then I learned to check the top layer of soil before watering. When it felt just a little dry, I sprayed it lightly. That small change really helped the seedlings thrive.
Every day, I checked the cups for signs of growth. The first tiny green sprouts appeared after about a week, and I could hardly contain my excitement. Seeing those little leaves breaking through the soil felt magical. I remember leaning close, observing the way they opened up, and even talking to them sometimes it felt silly, but it made me more connected to my plants.
Of course, I faced some challenges along the way. A thin white mold layer appeared on a few cups at one point because the air circulation was poor. I quickly removed the affected soil from the top and made sure the room had more airflow. I also learned that too little water could make the seedlings wilt, and too much could rot them. Finding the right balance took a few tries, but I finally got the rhythm.
By the end of the germination period, my little seedlings were strong and healthy, ready to be transplanted into bigger pots. I felt proud looking at them, knowing I had nurtured them from tiny seeds into small plants with proper care. That process taught me patience, observation, and the importance of small daily steps and it made me even more excited for the next stage: helping them grow into full tomato plants.
Step 4: Transplanting to Bigger Pots 🌿

Once my little tomato seedlings had 3–4 true leaves, I knew it was time to give them more space to grow. At this stage, the roots needed room, and the tiny cups were no longer enough. I learned that transplanting at the right time helps the plants absorb more nutrients and grow stronger. I remember feeling a mix of excitement and nervousness I didn’t want to hurt any of my little plants, but I knew they needed bigger homes.
For the bigger pots, I chose 10–12 inch plastic pots with good drainage holes. Drainage is super important, I learned, because tomatoes hate standing in water. I filled the pots with my prepared soil mix, leaving a small space at the top so I could water later without overflow. Seeing those little seedlings ready to move into their new homes was such a satisfying moment like giving them a fresh start.
Transplanting wasn’t as easy as I thought. The first time, I accidentally damaged some roots while trying to lift the seedlings. It was a sad moment, and I worried they might die. After that, I learned a simple trick using a small spoon to gently lift the seedlings with soil around their roots. This method worked perfectly, and none of the plants were harmed the next time.
I carefully dug small holes in the bigger pots and placed each seedling inside, gently pressing the soil around the base to keep it stable. I watered lightly immediately after transplanting. To reduce transplant shock, I kept the pots in a shaded area for two days before moving them back into sunlight. I was amazed at how this small step helped the seedlings recover quickly.
Watching my seedlings in their new pots was really rewarding. They suddenly looked more like real plants, with stronger stems and bigger leaves. I felt proud knowing that I had nurtured them from tiny seeds into small plants capable of growing into fruiting tomatoes. This moment made all the careful work worth it.
Transplanting taught me a lot about patience and gentle handling. I realized that giving plants the right space, light, and care at the right time makes a huge difference. After this step, I could already imagine them growing taller, flowering, and eventually giving me juicy, homegrown tomatoes. It felt like I was building a little garden world, one pot at a time.
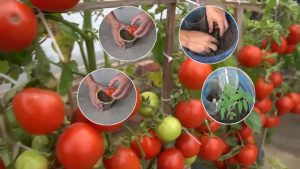
Step 5: Tomato Plant Care and Maintenance

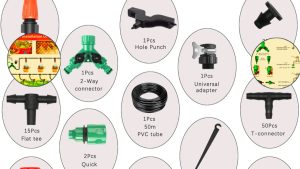
Also Need: Tomato Plant Care and Maintenance Automatic Drip and Mist Irrigation Kit
After my tomato plants got comfortable in their bigger pots, the real work began daily care. This part of growing tomatoes is like raising a little kid you have to watch them, feed them, and make sure they get enough light and air. When I first started, I didn’t realize how much attention they actually needed, but over time, I found my rhythm and the plants started to look happier and stronger.

Tomatoes love sunlight a lot of it. I learned this the hard way when I first kept my plants under partial shade thinking they’d burn in full sun. The result? Slow growth and pale leaves. Later, I shifted them to a spot where they got around 6–8 hours of direct sunlight daily, especially the morning light. Morning sun made a big difference the plants looked fresher and stronger by noon. Afternoon heat sometimes got harsh, so I placed a light net shade to protect them. Now I always say morning sunlight is gold for tomatoes.
In the beginning, I used to water every day because I thought more water means faster growth. But soon, the soil started staying soggy, and one plant even began to rot near the roots. That’s when I realized tomatoes don’t like wet feet. They love deep watering but not too often. So I started watering early in the morning every 2–3 days, checking the soil with my finger before watering. When the top felt dry, I watered slowly until it drained out from the bottom. After doing this, the leaves became stronger, and I could see healthy new shoots growing.
Feeding time was like giving my plants a healthy meal. I used homemade compost and sometimes banana peel fertilizer or fish emulsion. Once every two weeks, I also gave them compost tea a simple mix I made by soaking compost in water overnight. After using it, I noticed something amazing within a week, the leaves turned a deeper green, and the plant looked more alive. I realized tomatoes need steady feeding, not too heavy but regular, to keep producing well.

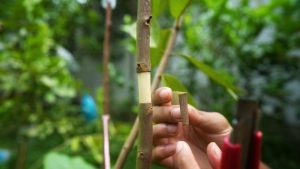
When my tomato plants started growing tall, I saw tiny shoots appearing between the main stem and branches. At first, I left them, thinking more branches mean more fruits. But soon the plant got too bushy, and air couldn’t move freely. After learning online and watching others, I started pruning those side shoots carefully with my fingers. I also added bamboo sticks for support and tied the plants softly with cloth strips. The first time I didn’t use support, one of my plants bent over from the fruit weight a lesson I’ll never forget. Now I always tie them early before they get too heavy.
No matter how careful you are, pests will try to visit your tomato garden. I had problems with small whiteflies and aphids in the early days. Instead of using chemicals, I sprayed neem oil mixed with water once a week. It worked well and also gave a nice shine to the leaves. But one time, I lost a whole plant to a disease called blight the leaves started turning brown and curling. It taught me the importance of keeping good air circulation and not crowding the plants. Now I always keep some space between pots and remove lower leaves when needed.
Taking care of tomato plants taught me patience and observation. Every little change leaf color, flower drop, or even how fast the soil dries tells you something. I learned to listen to my plants. It’s a peaceful routine now every morning, I check the leaves, touch the soil, and feel proud knowing these green friends are growing strong because of my care.
Oh, you didn’t have to tell me.I have a complete journey with mangoes,Growing Dragon Fruit at Home,Guava Growing Guide
You will be truly surprised when you read this. Read this article to learn more about Tometo fruit in detail.
Step 6: Flowering and Fruit Development

After weeks of watering, feeding, and caring, the most magical moment finally came I saw the first tiny yellow flowers on my tomato plants! I still remember that morning. I went out with my cup of tea, looked at the plants, and smiled like a proud parent. Those little blooms were the first sign that my hard work was paying off. At that stage, I understood that the plants were mature enough to start fruiting, and I needed to take extra care from then on.
When I saw those first flowers, I honestly felt a mix of excitement and fear. Excitement because I knew fruits would come soon, and fear because I didn’t want anything to go wrong. I noticed some flowers opened wide in the morning and closed by evening. I learned that pollination usually happens during that time. Since I was growing tomatoes in containers on my balcony, there weren’t many bees around. So, I used a small soft brush and gently touched each flower to help move the pollen kind of like playing a little matchmaker for my plants! Within a few days, I could see tiny green bulbs forming behind the flowers. That moment felt magical.

As the flowers started blooming more, I noticed something strange a few of them fell off without forming fruit. At first, I thought maybe I did something wrong. Later, I found out it was due to hot weather and a lack of potassium in the soil. The next time, I mixed a bit of banana peel fertilizer into the soil, and it worked wonders. The flower drop reduced a lot. I also realized that tomatoes love bright light, but too much afternoon heat can cause stress. So I made sure they got enough sunlight in the morning but some shade after noon. Small changes like that really helped more flowers turn into fruits.
Once the tiny green tomatoes started forming, I began to adjust my care routine. I reduced the watering a little to avoid cracking the fruits and made sure the soil stayed moist but not soggy. I also added a bit of compost and organic fertilizer once every two weeks. It gave the plants the strength to carry all the growing fruits. I remember one plant had so many tomatoes that the stem started to bend. I quickly tied it with a soft cloth to a bamboo stick to keep it straight. Watching those green tomatoes slowly grow bigger day by day felt so satisfying like seeing a small dream come true
Not everything went perfectly, though. Once, I added too much fertilizer, thinking it would make the tomatoes grow faster. But instead, the leaves became too big, and flowers stopped appearing. That’s when I learned that too much feeding can actually harm the plant. I stopped fertilizing for a few weeks and focused only on proper watering. Slowly, the balance came back. It taught me that plants don’t just need “more” they need “right.” Every small observation helps to understand what they want.
Every morning, I used to check how much my tomatoes had grown overnight. Some were round, some a little oval, and all looked shiny green. It’s funny how attached you can get to your plants I used to talk to them while watering! As days passed, the green started turning slightly yellow, and that’s when I knew they were getting ready to ripen. I made sure to keep the pots in a warm and bright spot, as sunlight helps the fruits change color faster. Seeing the first tomato turn red was one of the happiest moments of the whole journey.
Flowering and fruit development was the most rewarding stage for me. After weeks of effort from seed to transplant this was the moment I could finally see real results. Each fruit felt like a reward for the care I gave every day. I realized growing tomatoes is not just about gardening; it’s about learning patience, attention, and love. It’s amazing how these little green plants can teach so much about life.
Step 7: Tomato Harvesting and Ripening

After months of care, watering, feeding, and waiting, the most exciting part finally arrived harvesting time! Seeing those bright red tomatoes hanging from the plants made me feel like all my patience was finally worth it. I still remember that morning when I noticed the first tomato turning fully red. I couldn’t stop smiling. It felt like watching a child grow up from seed to a full-grown, beautiful fruit.
One of the first things I learned about tomato harvesting was that color and feel are the best signs. When my tomatoes started turning from deep green to a soft red or orange-red, I knew they were almost ready. I gently touched them if the fruit felt firm but not too hard, that was a perfect time. At first, I was too excited and picked one when it was only half red. Surprisingly, it ripened beautifully indoors within a couple of days. After that, I started picking a few at that half-red stage to let them ripen naturally inside the house. This way, I could avoid birds or insects damaging them outside.
When it came to harvesting, I learned that being gentle is key. The first time, I pulled a tomato too hard and ended up breaking a small branch lesson learned! From then on, I used the twist and snap method. I held the tomato gently and twisted it until it came off easily. Sometimes, I even used a small pair of scissors to cut them with a bit of stem attached. The day I harvested my first full batch around 15 tomatoes I felt so proud. It was one of those moments where I realized how much joy a small garden can bring.
After picking, I kept the tomatoes in a dry, cool place indoors. I didn’t wash them immediately; instead, I waited until I was ready to eat or cook. I noticed that tomatoes ripen faster if kept near a sunny window or inside a paper bag with a banana (because of the ethylene gas). One of my favorite moments was making a fresh tomato salad from my own harvest. The taste was so natural and juicy that I almost couldn’t believe I grew it myself. It felt amazing to eat something that came from my own care and effort.
Not every tomato turned out perfect, though. Some cracked because of uneven watering sometimes too much, sometimes too little. I also noticed that tomatoes left too long on the plant could get soft or even attract insects. I learned to pick them once they were 80–90% ripe and let the rest happen indoors. This way, I could enjoy perfect tomatoes without losing any to over-ripening or pests. These small lessons came through trial and error, but they helped me improve with every batch.
Harvesting tomatoes became my favorite part of gardening. Every fruit felt like a reward for the care I gave. I often called my family to show them the fresh harvest it made me so happy! Sometimes, I even gifted a few tomatoes to my neighbors, and they couldn’t believe they came from a pot garden. Watching their surprised faces made me even prouder. Gardening really connects you with people and nature in a beautiful way.
Growing tomatoes from seeds and finally harvesting them taught me more than I expected. It’s not just about gardening it’s about patience, observation, and love. Each tomato on my table reminded me of the journey from tiny seeds, small seedlings, careful transplanting, regular watering, and all the ups and downs along the way. That first bite of my homegrown tomato wasn’t just food it was pure happiness in every bite.
My Tomato Growing Journey from Seed to Ripe Fruit
I’ve always loved the taste of fresh tomatoes especially when they’re sweet, juicy, and full of flavor. But where I live, there isn’t much open space for gardening. For a long time, I thought growing my own tomatoes was impossible. Then one day, I decided to try something new container gardening. I thought, “If I can’t have a big garden, maybe I can make a small one in pots.” That small decision turned into one of the best experiences of my life.
At first, I didn’t know much about growing plants in containers. I started with a few small pots, some soil, and a handful of tomato seeds. I still remember how excited I felt holding those tiny seeds in my hand it was like holding little promises of life. I wanted to see them grow, to care for them, and to someday taste the fruits of my own effort. My curiosity and love for fresh homegrown food gave me the push to start this beautiful journey.
The first time I tried, things didn’t go perfectly. Some seeds didn’t sprout, a few seedlings got too much water, and one plant even broke during transplanting. But instead of giving up, I learned something new from each mistake. I realized that gardening is not about perfection it’s about patience and care. Every little step taught me how nature works and how small changes make a big difference.
In this blog, I’ll take you through my complete journey from choosing the right tomato seeds, preparing the soil, sowing and germinating, transplanting into bigger pots, and caring for the plants, all the way to harvesting and ripening those beautiful red fruits. Each step came with its own lessons, challenges, and little victories. I’ll share not only what I did but also how I felt because growing tomatoes isn’t just about plants, it’s also about emotions.
Container gardening is a great option for anyone especially beginners like me when I first started. You don’t need a big backyard or fancy tools. Just a few pots, some soil, sunlight, and a bit of love are enough. What I love most about container gardening is how flexible it is. You can move your plants to get more sun, control the soil mix, and avoid many common garden pests. It’s perfect for small balconies, rooftops, or even a sunny window corner.
After about three months of learning, watering, and caring, I finally got to pick my first homegrown tomato. It was small, red, and shiny and honestly, it tasted better than anything I ever bought from a store. That one tomato made me feel so proud and connected to nature. It showed me that with a little patience and consistency, anyone can grow something beautiful even in a tiny space.
So, if you’ve ever dreamed of growing your own food, this story is for you. Let me take you through my journey step by step so that you can experience the same joy I did, watching a tiny seed turn into something amazing. 🍅